Sunday, December 11, 2011

The Mad Pianist

The final image:


And here's what I started with:
You can see my Christmas Tree poking out from the side, the sheet music isn't evenly spread and the back walls are lit haha. So I had to do some work to correct for my bad prep. I also did the color work in two steps. First I added a sepia filter to the photo and desaturated it. Then I added a tonal contrast to myself to make it more edgy.

Wednesday, September 14, 2011

Film Noir Look

 And the original after some adjustments in lightroom:
Normally I never use plugins in photoshop, but for this photo I used Nik Color Efex. I used it a couple different times, first was to smooth the skin. Second, to add a tonal contrast only to the background. And Lastly to add a glamour glow to the model. At the same time I did some light painting(50% gray soft light layer with mask) to brighten areas like the eyes. And for the black and white I used the film negative filter. Gotta say, I'm really happy with how it came out!

Sunday, September 11, 2011

Haunted by the Past


A favorite picture of mine I did with my good friend Francis again. Composed of these two pictures and a picture of just the wall

I love posting before and afters because it really shows that the sky is the limit with what you can do with programs like photoshop and after effects. I'm not saying that great amounts of time isn't involved too, like the rotoscoping for this photo took a long time, but you really can recreate your dreams. I think a big thing for photographers is to have a final image clearly in mind. My best photos came from ideas that I had clearly laid out in my mind.

And just like my picture "Left Alone" the fog was made from atmosphere footage from Action Movie Essentials 2 at videocopilot.com. The greenfog look was inspired by spongebob haha

Saturday, August 13, 2011

Left Alone

I've finished my latest photoshoot and got some great greenscreen photos. A big thanks to my model Joyce and my MUA Chelsea. Here's one of the photos: Left Alone


And here's a cropped version of the original


I had a very particular look for this image in mind. I wanted a gray background and a TON of fog surrounding her lower half. I used the atmosphere footage from videocopilot.net's action movie essential 2. After layering about 20 stills from the footage haha, I got a look that fit what I had in mind. Then several level adjustments to the model to get dark hair with a ghostly skin tone, and an adjustment layer of contrast and diffusion and wah-lah. More pictures to come from this shoot!

Thursday, July 28, 2011

Mr. Sci Fi Hero

Presenting Francis:

And as the usual tradition goes, heres the original with minor cc in lightroom:


So yes, I wish I could've gotten natural flares like that from my headlights, but sadly that was impossible. Even with my headlights, I just got a ghastly glow. So I opted to used video software adobe after effects and the plug in optical flares to do the lens flares. For the record, adding lens flares has got to be one of the coolest most fun edits you can do on a photo haha

For the physical lighting, we were in a parking garage with terrible overhead lights which I removed in post(along with a pillar). So I set up one flash at full power through an umbrella just slightly to camera right. My second flash was to far camera left bare and at half power. That gave most of the shadows and the awesome highlight!

And for kicks, here's one of me:

Sunday, July 17, 2011

Cries Lost in a Pool

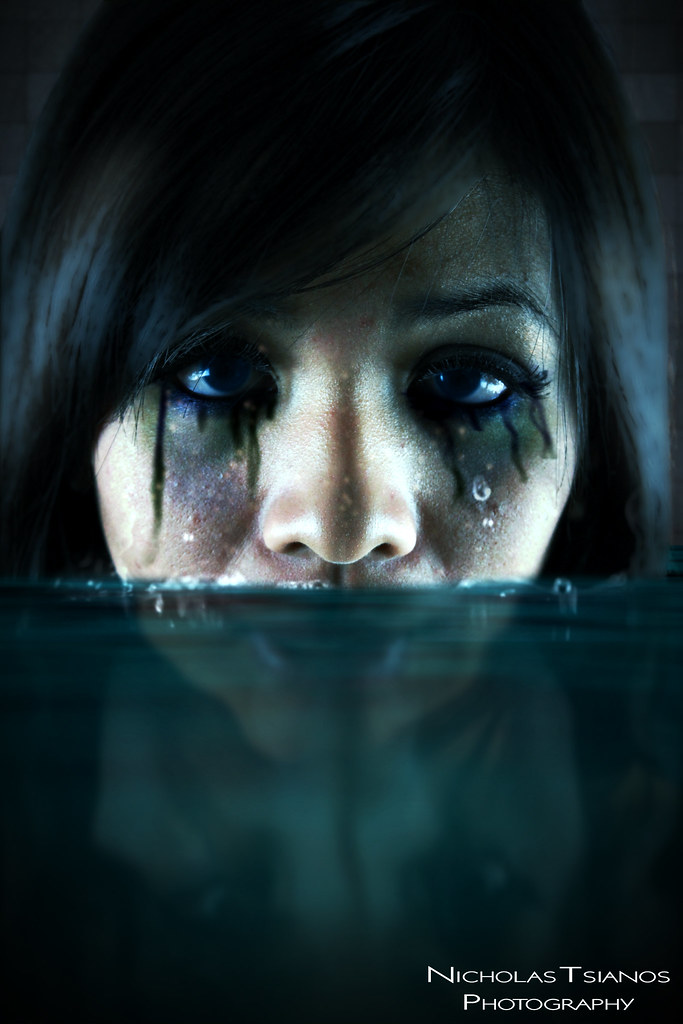
Here is the final image that I am quite proud of:
http://www.flickr.com/photos/32073706@N05/5918580217/in/photostream

And.. dun dun dun dun... here's the original:


So alot of things going on here to say the least. First off, I edited it in Adobe After Effects for video editing, because that's what I was most comfortable with at the time. The water, which took ALOT of minor tweaking was a 3D layer of fractal noise, scaled and tinted black and blue, and with a slight blur. I really think the reflection on the water helps sell it, although it's pretty obvious its cg water.

I did the makeup/running mascara in AE also, which was to protest from the model Chelsea who was alot the MU artist for this shoot. It was a mix of the burn tool and color overlays to get the look I wanted. I also probably added a turbulent displace to try to get some organic curves. I also added a touch of blue to her eyes and some glossiness to her hair.

Lastly I did some color grading and blasted the contrast beyond normally acceptable limits haha and added a bluish tint with a curves adjustment. And wa-lah.

Hope you guys like it.

Tuesday, July 12, 2011

Lost in the Thicket

Here's a photo I did a year ago, but uploaded to my relatively new flickr account:
model: chelsea

This was a really neat photo to do! First off, it was shot in front of a (poorly lit) greenscreen, as seen below:


I had alot of different possible looks for this picture, and I sorta stumbled upon the last look by accident. I grabbed some photos of bare trees like this:


So I overlayed those on, one in the foreground and one in the background. Meanwhile applying a crushed black and white look to the model, matching the trees. One person I talked to suggested the branches could've been done with a burn tool, which while probably hard to get an organic look, is a substitute. So all-in-all a really simple method for a pretty cool pic